

2 years back, I composed A Guide to Docker and ROS, which is among my most often watched blog posts– most likely due to the fact that it is a difficult subject and individuals were looking for responses. Ever since, I have actually had the possibility to utilize Docker extra in my job and have actually grabbed some brand-new methods. This was long past due, yet I have actually ultimately gathered my upgraded discoverings in this blog post.
Lately, I experienced a post entitled ROS Docker; 6 reasons why they are not a good fit, and I mostly concur with it. Nonetheless, the truth is that it’s still rather hard to make certain a reproducible ROS setting for individuals that have not invested years dealing with the ROS discovering contour and are experienced at debugging reliance and/or develop mistakes … so Docker is still quite a prop that we draw on to obtain functioning demonstrations (and occasionally items!) out the door.
If the write-up over hasn’t entirely prevented you from starting this Docker journey, please appreciate analysis.
Reviewing Our Dockerfile with ROS 2
Since ROS 1 gets on its last variation and coming close to end of life in 2025, I believed it would certainly be suitable to rework the TurtleBot3 example repo from the previous blog post utilizing ROS 2.
The majority of the huge adjustments in this upgrade pertain to ROS 2, consisting of customer collections, launch documents, andconfiguring DDS The instances themselves have actually been upgraded to utilize the most up to date devices for habits trees: BehaviorTree.CPP 4/ Groot 2 for C++ and py_trees/ py_trees_ros_viewer for Python. To find out more on the instance and/or habits trees, describe my Introduction to Behavior Trees blog post.
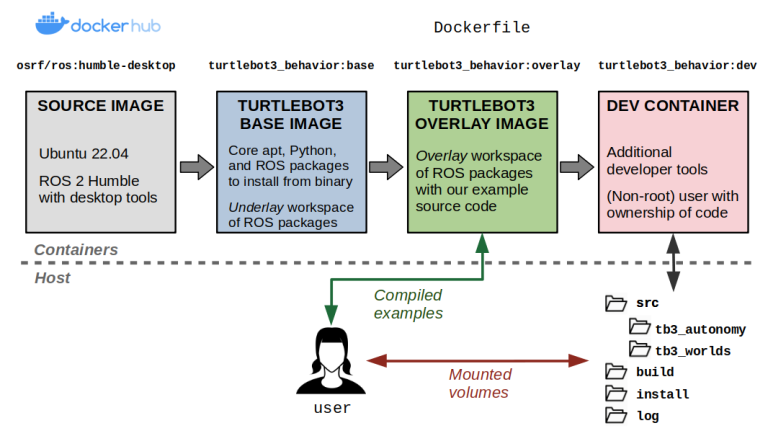
From a Docker viewpoint, there aren’t a lot of distinctions. Our container design will certainly currently be as adheres to:
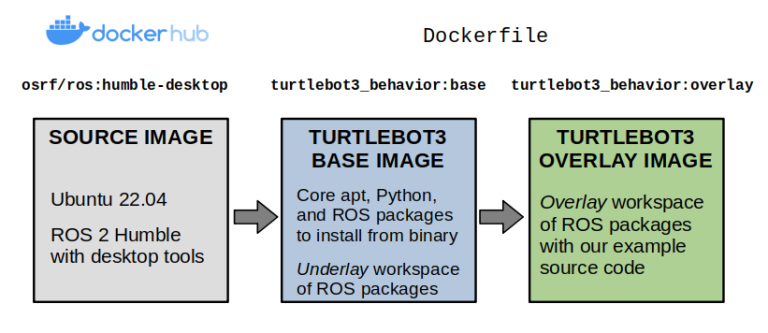
Layers of our TurtleBot3 instance Docker photo.
We’ll begin by making our Dockerfile, which specifies the materials of our photo. Our preliminary base layer acquires from among the public ROS images, osrf/ros: humble-desktop, and establishes the dependencies from our example repository right into an padding office. These are specified utilizing a vcstool repos data.
Notification that we have actually established the disagreement, ARG ROS_DISTRO= simple, so it can be altered for various other circulations of ROS 2 (Iron, Rolling, and so on). As opposed to developing several Dockerfiles for various setups, you must attempt utilizing develop debates like these as high as feasible without being “excessively creative” in a manner that effects readability.
ARG ROS_DISTRO= simple
########################################
# Base Picture for TurtleBot3 Simulation #
########################################
FROM osrf/ros:$ {ROS_DISTRO} -desktop computer as base
ENV ROS_DISTRO=$ {ROS_DISTRO}
COVERING [“https://robohub.org/bin/bash”, “-c”]
# Develop Colcon office with exterior reliances
RUN mkdir -p/ turtlebot3_ws/ src
WORKDIR/ turtlebot3_ws/ src
Duplicate dependencies.repos.
RUN vcs import < dependencies.repos.# Construct the base Colcon office, setting up reliances initially.WORKDIR/ turtlebot3_ws.RUN resource/ opt/ros/$ {ROS_DISTRO}/ setup.bash.& & apt-get upgrade -y.& & rosdep mount-- from-paths src-- ignore-src-- rosdistro $ {ROS_DISTRO} -y.& & colcon develop-- symlink-install.ENV TURTLEBOT3_MODEL= waffle_pi
To develop your photo with a details disagreement– allow’s claim you intend to utilize ROS 2 Moving rather– you might do the adhering to … given that all your referrals to $ {ROS_DISTRO} really have something that appropriately deals with to the moving circulation.
 docker develop -f docker/Dockerfile
-- build-arg=" ROS_DISTRO= rolling"
-- target base -t turtlebot3_behavior: base.
I directly have actually had numerous concerns in ROS 2 Simple and later with the default DDS supplier (FastDDS), so I such as to change my default application to Cyclone DDS by mounting it and establishing an atmosphere variable to guarantee it is constantly utilized.
 # Utilize Cyclone DDS as middleware
RUN apt-get upgrade & & apt-get mount -y-- no-install-recommends
ros-$ {ROS_DISTRO} -rmw-cyclonedds-cpp
ENV RMW_IMPLEMENTATION= rmw_cyclonedds_cpp
Currently, we will certainly develop our overlay layer. Right here, we will certainly duplicate over the instance resource code, mount any type of missing out on reliances with rosdep mount, and established an entrypoint to run each time a container is introduced.
 ###########################################
# Overlay Picture for TurtleBot3 Simulation #
###########################################
FROM base AS overlay
# Develop an overlay Colcon office
RUN mkdir -p/ overlay_ws/ src
WORKDIR/ overlay_ws
DUPLICATE./ tb3_autonomy/./ src/tb3 _ freedom/
DUPLICATE./ tb3_worlds/./ src/tb3 _ globes/
RUN resource/ turtlebot3_ws/ install/setup. celebration
& & rosdep mount– from-paths src– ignore-src– rosdistro $ {ROS_DISTRO} -y
& & colcon develop– symlink-install
# Establish the entrypoint
DUPLICATE./ docker/entrypoint. sh/
ENTRYPOINT [ “https://robohub.org/entrypoint.sh” ]
The entrypoint specified over is a Bash manuscript that resources ROS 2 and any type of offices that are constructed, and establishes setting variables needed to run our TurtleBot3 instances. You can utilize entrypoints to do any type of various other sorts of arrangement you may discover beneficial for your application.
 #!/ bin/bash
# Standard entrypoint for ROS/ Colcon Docker containers
# Resource ROS 2
resource/ opt/ros/$ {ROS_DISTRO}/ setup.bash
# Resource the base office, if constructed
if[ -f /turtlebot3_ws/install/setup.bash ]
after that
resource/ turtlebot3_ws/ install/setup. celebration
export TURTLEBOT3_MODEL= waffle_pi
export GAZEBO_MODEL_PATH=$ GAZEBO_MODEL_PATH:$( ros2 pkg prefix turtlebot3_gazebo)/ share/turtlebot3 _ gazebo/models
fi
# Resource the overlay office, if constructed
if[ -f /overlay_ws/install/setup.bash ]
after that
resource/ overlay_ws/ install/setup. celebration
export GAZEBO_MODEL_PATH=$ GAZEBO_MODEL_PATH:$( ros2 pkg prefix tb3_worlds)/ share/tb3 _ worlds/models
fi
# Perform the command entered this entrypoint
director “$ @”
At this moment, you must have the ability to develop the complete Dockerfile:
docker develop
- f docker/Dockerfile-- target overlay
- t turtlebot3_behavior: overlay.
After that, we can begin among our instance launch documents with the ideal setups with this mouthful of a command. The majority of these setting variables and quantities are required to have graphics and ROS 2 networking working appropriately from inside our container.
 docker run -it-- web= host-- ipc= host-- blessed
-- env=" DISPLAY SCREEN"
-- env=" QT_X11_NO_MITSHM= 1"
-- quantity=" https://robohub.org/tmp/.X11-unix:/tmp/.X11-unix:rw"
-- quantity="$ {XAUTHORITY}:/ origin/. Xauthority"
turtlebot3_behavior: overlay
celebration -c "ros2 launch tb3_worlds tb3_demo_world. launch.py"
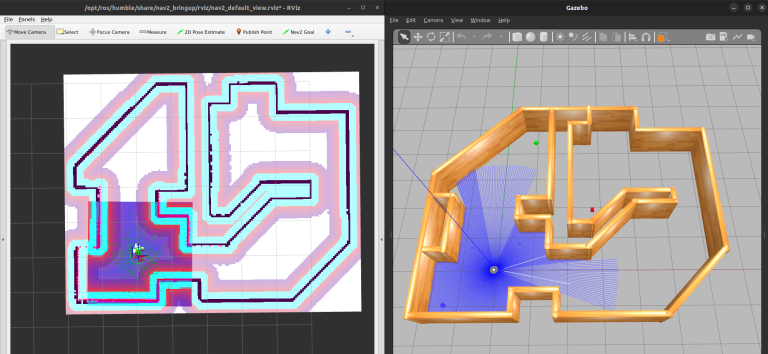
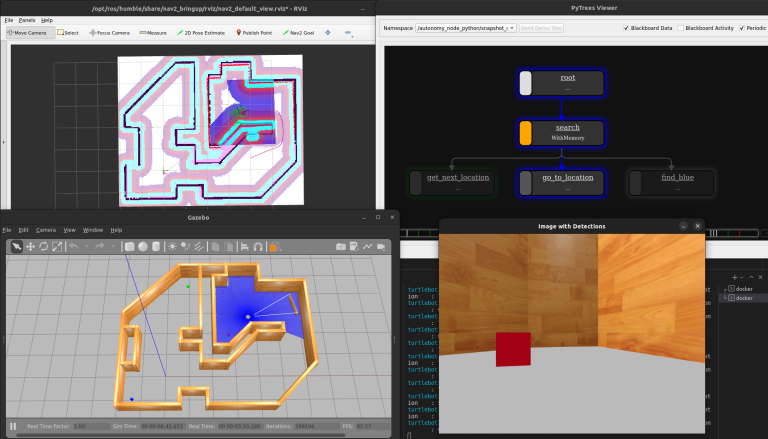
Our TurtleBot3 instance simulation with RViz (left) and Gazebo timeless (ideal).
Presenting Docker Compose
From the last couple of fragments, we can see exactly how the docker develop and docker run commands can obtain actually lengthy and unwieldy as we include extra alternatives. You can cover this in a number of abstractions, consisting of scripting languages and Makefiles … yet Docker has actually currently fixed this trouble via Docker Compose.
Briefly, Docker Compose enables you to develop a YAML data that catches all the arrangement required to establish structure pictures and running containers.
Docker Compose additionally separates itself from the “simple” Docker command in its capacity to coordinate solutions This includes structure several pictures or targets within the very same photo( s) and introducing a number of programs at the very same time that consist of a whole application. It additionally allows you prolong existing solutions to decrease copy-pasting of the very same setups in several locations, specify variables, and extra.
Completion objective is that we have brief commands to handle our instances:
- docker make up develop will certainly develop what we require
- docker compose up
will certainly release what we require
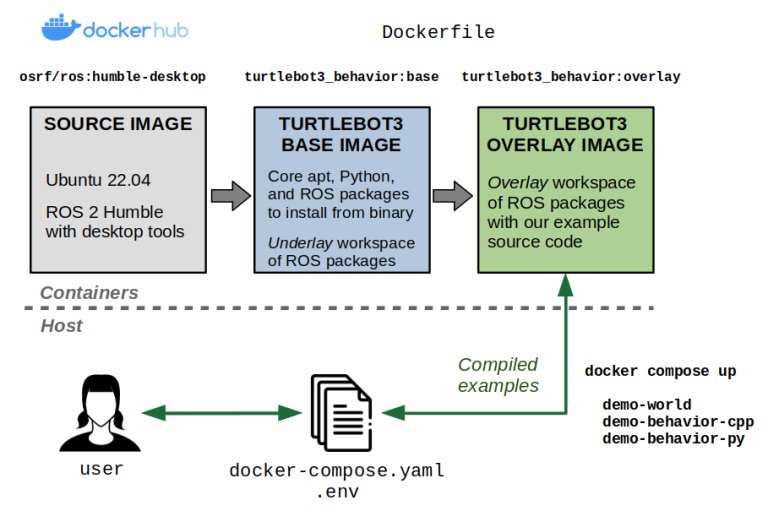
Docker Compose enables us to even more quickly develop and run our containerized instances.
The default name of this enchanting YAML data is docker-compose. yaml For our instance, the docker-compose. yaml data looks as adheres to:
 variation: "3.9"
solutions:
# Base photo consisting of reliances.
base:
photo: turtlebot3_behavior: base
develop:
context:.
dockerfile: docker/Dockerfile
args:
ROS_DISTRO: simple
target: base
# Interactive covering
stdin_open: real
tty: real
# Networking and IPC for ROS 2
network_mode: host
ipc: host
# Required to present visual applications
blessed: real
setting:
# Required to specify a TurtleBot3 version kind
- TURTLEBOT3_MODEL=$ {TURTLEBOT3_MODEL:- waffle_pi}
# Permits visual programs in the container.
- DISPLAY SCREEN=$ {DISPLAY SCREEN}
- QT_X11_NO_MITSHM= 1
- NVIDIA_DRIVER_CAPABILITIES= all
quantities:
# Permits visual programs in the container.
-/ tmp/. X11-unix:/ tmp/. X11-unix: rw
- $ {XAUTHORITY:-$ HOME/. Xauthority}:/ origin/. Xauthority
# Overlay photo consisting of the instance resource code.
overlay:
expands: base
photo: turtlebot3_behavior: overlay
develop:
context:.
dockerfile: docker/Dockerfile
target: overlay
# Trial globe
demo-world:
expands: overlay
command: ros2 launch tb3_worlds tb3_demo_world. launch.py
# Actions trial utilizing Python and py_trees
demo-behavior-py:
expands: overlay
command: >
ros2 launch tb3_autonomy tb3_demo_behavior_py. launch.py
tree_type:=$ {BT_TYPE:?}
enable_vision:=$ {ENABLE_VISION:?}
target_color:=$ {TARGET_COLOR:?}
# Actions trial utilizing C++ and BehaviorTree.CPP
demo-behavior-cpp:
expands: overlay
command: >
ros2 launch tb3_autonomy tb3_demo_behavior_cpp. launch.py
tree_type:=$ {BT_TYPE:?}
enable_vision:=$ {ENABLE_VISION:?}
target_color:=$ {TARGET_COLOR:?}
As you can see from the Docker Compose data over, you can define variables utilizing the acquainted $ driver in Unix based systems. These variables will certainly by default read from either your host setting or via an atmosphere data (typically called.env). Our example.env data appears like this:
 # TurtleBot3 version
TURTLEBOT3_MODEL= waffle_pi
# Actions tree kind: Can be ignorant or line up.
BT_TYPE= line up
# Ready to real to utilize vision, else incorrect to just do navigating actions.
ENABLE_VISION= real
# Target shade for vision: Can be red, eco-friendly, or blue.
TARGET_COLOR= blue
At this moment, you can develop whatever:
 # By default, grabs a 'docker-compose. yaml' and '. env' data.
docker make up develop
# You can additionally clearly define the documents
docker make up– data docker-compose. yaml– env-file. env develop
After that, you can run the solutions you appreciate:
 # Raise the simulation
docker compose up demo-world
# After the simulation has actually begun,
# release among these in a different Incurable
docker compose up demo-behavior-py
docker compose up demo-behavior-cpp
Establishing Programmer Containers
Our instance until now functions wonderful if we intend to package up functioning instances to various other customers. Nonetheless, if you intend to create the instance code within this setting, you will certainly require to get rid of the adhering to barriers:
- Every single time you change your code, you will certainly require to reconstruct the Docker photo. This makes it very ineffective to obtain responses on whether your adjustments are functioning as meant. This is currently an instantaneous deal-breaker.
- You can resolve the above by utilizing bind mounts to sync up the code on your host maker with that said in the container. This obtains us on the ideal track, yet you’ll discover that any type of documents produced inside the container and installed on the host will certainly be possessed by
originas default. You can navigate this by whipping out thesudoandchownhammer, yet it’s not needed. - All the devices you might utilize for growth, consisting of debuggers, are most likely missing out on inside the container … unless you mount them in the Dockerfile, which can bloat the dimension of your circulation photo.
Thankfully, there is a principle of a programmer container (or dev container). To place it just, this is a different container that allows you really do your growth in the very same Docker setting you would certainly utilize to release your application.
There are numerous means of executing dev containers. For our instance, we will certainly change the Dockerfile to include a brand-new dev target that expands our existing overlay target.
Dev containers enable us to create inside a container from our host system with marginal expenses.
This dev container will certainly do the following:
- Install added plans that we might discover valuable for growth, such as debuggers, full-screen editor, and visual designer devices. Seriously, these will certainly not belong to the
overlaylayer that we will certainly deliver to finish customers. - Develop a brand-new customer that has the very same customer and team identifiers as the customer that constructed the container on the host. This will certainly make it such that all documents produced within the container (in folders we appreciate) have the very same possession setups as if we had actually produced the data on our host. By “folders we appreciate”, we are describing the ROS office which contains the resource code.
- Placed our entrypoint manuscript in the customer’s Celebration account (
~/. bashrcdata). This allows us resource our ROS setting not simply at container start-up, yet each time we affix a brand-new interactive covering while our dev container continues to be up.
 #####################
# Advancement Picture #
#####################
FROM overlay as dev
# Dev container debates
ARG USERNAME= devuser
ARG UID= 1000
ARG GID=$ {UID}
# Mount added devices for growth
RUN apt-get upgrade & & apt-get mount -y– no-install-recommends
gdb gdbserver nano
# Develop brand-new customer and home directory site
RUN groupadd– gid $GID $USERNAME
& & useradd– uid $ {GID}– gid $ {UID}– create-home $ {USERNAME}
& & resemble $ {USERNAME} ALL=( origin) NOPASSWD: ALL >/ etc/sudoers. d/$ {USERNAME}
& & chmod 0440/ etc/sudoers. d/$ {USERNAME}
& & mkdir -p/ home/$ {USERNAME}
& & chown -R $ {UID}:$ {GID}/ home/$ {USERNAME}
# Establish the possession of the overlay office to the brand-new customer
RUN chown -R $ {UID}:$ {GID}/ overlay_ws/
# Establish the customer and resource entrypoint in the customer’s. bashrc data
CUSTOMER $ {USERNAME}
RUN resemble “resource/ entrypoint.sh” >>/ home/$ {USERNAME}/. bashrc
You can after that include a brand-new dev solution to the docker-compose. yaml data. Notification that we’re including the resource code as quantities to install, yet we’re additionally mapping the folders produced by colcon develop to a colcon folder on our host data system. This makes it such that produced develop artefacts linger in between quiting our dev container and bringing it back up, or else we would certainly need to do a tidy reconstruct each time.
 dev:
expands: overlay
photo: turtlebot3_behavior: dev
develop:
context:.
dockerfile: docker/Dockerfile
target: dev
args:
- UID=$ {UID: -1000}
- GID=$ {UID: -1000}
- USERNAME=$ {USERNAME:- devuser}
quantities:
# Mount the resource code
-./ tb3_autonomy:/ overlay_ws/ src/tb3 _ freedom: rw
-./ tb3_worlds:/ overlay_ws/ src/tb3 _ globes: rw
# Mount colcon develop artefacts for faster rebuilds
-./. colcon/build/:/ overlay_ws/ develop/: rw
-./. colcon/install/:/ overlay_ws/ mount/: rw
-./. colcon/log/:/ overlay_ws/ log/: rw
customer: $ {USERNAME:- devuser}
command: rest infinity
At this moment you can do:
 # Beginning the dev container
docker compose up dev
# Connect an interactive covering in a different Incurable
# KEEP IN MIND: You can do this several times!
docker make up director -it dev celebration
Since we have actually installed the resource code, you can make alterations on your host and reconstruct inside the dev container … or you can utilize helpful devices like the Visual Studio Code Containers extension to straight create inside the container. Approximately you.
For instance, when you’re inside the container you can develop the office with:
colcon develop
Because of our quantity installs, you’ll see that the materials of the colcon/build, colcon/install, and colcon/log folders in your host have actually been occupied. This suggests that if you close down the dev container and raise a brand-new circumstances, these documents will certainly remain to exist and will certainly accelerate rebuilds utilizing colcon develop
Additionally, due to the fact that we have actually experienced the problem of making a customer, you’ll see that these documents are not possessed by origin, so you can remove them if you want to clean the develop artefacts. You must attempt this without making the brand-new customer and you’ll face some frustrating authorizations obstructions.
$ ls -al.colcon
overall 20
drwxrwxr-x 5 sebastian sebastian 4096 Jul 9 10:15.
drwxrwxr-x 10 sebastian sebastian 4096 Jul 9 10:15.
drwxrwxr-x 4 sebastian sebastian 4096 Jul 9 11:29 develop
drwxrwxr-x 4 sebastian sebastian 4096 Jul 9 11:29 mount
drwxrwxr-x 5 sebastian sebastian 4096 Jul 9 11:31 log
The idea of dev containers is so prevalent now that a requirement has actually arised atcontainers.dev I additionally intend to explain a few other wonderful sources consisting of Allison Thackston’s blog, Griswald Brooks’ GitHub repo, and the authorities VSCode dev containers tutorial.
Verdict
In this blog post, you have actually seen exactly how Docker and Docker Compose can assist you develop reproducible ROS 2 settings. This consists of the capacity to set up variables at develop and run time, along with developing dev containers to assist you create your code in these settings prior to dispersing it to others.
We have actually just scraped the surface area in this blog post, so ensure you jab about at the sources connected throughout, try the example repository, and typically remain interested concerning what else you can do with Docker to make your life (and your customers’ lives) simpler.
As constantly, please do not hesitate to connect with concerns and responses. Docker is a very configurable device, so I’m really interested concerning exactly how this benefits you or whether you have actually come close to points in a different way in your job. I may discover something brand-new!
发布者:Sebastian Castro,转转请注明出处:https://robotalks.cn/an-updated-guide-to-docker-and-ros-2/