
Creating independent robotics is hard. Due to the fact that it calls for both software and hardware to be created, incorporated and evaluated, doing so in a physical atmosphere is challenging and expensive. Utilizing simulations, robotic programmers can evaluate their code swiftly, repeating lot of times prior to ultimately releasing software application to the equipment for screening in the real life. Having a high-fidelity simulator permits programmers to evaluate vision, understanding, and acknowledgment systems for their robotics with high self-confidence. Open 3D Engine (O3DE) is a neighborhood driven, open resource simulator that supplies that degree of high-fidelity sensible making required for robot simulations.
An Intro to O3DE
O3DE is a 3D engine efficient in producing and running sensible 3D globes for pc gaming. To attain photo-realistic making, it makes use of a configurable, multi-threaded making engine called Atom, which sustains functions such as literally based making (PBR), ray-tracing, post-processing, and onward + making. O3DE likewise can replicating real-world physics with its Nvidia PhysX based physics engine.
O3DE is based upon a modular system design called theGems system This permits you to choose and set up any type of variety of plans (Treasures) for a job depending upon its requirements. Treasures can originate from the O3DE job itself, third-party companies, or customized made. With the current enhancement of the ROS 2 gem, this makes it possible for O3DE to deal with robotics simulations that make use of the Robot Os (ROS) to create robotics. By supplying scene making and physics modeling, robotics programmers can evaluate and educate understanding versions that very closely appear like the real life in a pure simulation atmosphere.
In order to quicken the advancement cycle, programmers can scale out their simulations by running them in parallel in the cloud. Having the ability to run simulations in the cloud includes efficiency, expense efficiency, and scalability to the robotic advancement procedure by supplying accessibility to high efficiency GPU circumstances as needed without the requirement for expensive financial investment in physical equipment or on-site facilities. AWS RoboMaker sustains GPU-based simulation tasks by running any type of simulator in an OCI certified container such as Docker.
This tutorial will certainly look at producing a Docker picture from an O3DE example application (Robot Vacuum Sample) and releasing it as a simulation task in AWS RoboMaker.
Requirements
This tutorial calls for an AWS account login with Amazon ECR and AWS RoboMaker accessibility IAM authorizations. It likewise calls for an advancement system, or an AWS Cloud9 advancement atmosphere with the list below needs:
- Linux Ubuntu 20.04 or 22.04
- At the very least 60 GB of complimentary disk area
- AWS CLI set up
- Docker engine set up.
Walkthrough
Develop the container photos
The Robot Vacuum Sample application features a Dockerfile that is made use of to develop container photos for both the simulation in addition to the navigating pile.
Note: Every one of the command line instances in this walkthrough will certainly be based upon a work area folder $WORK AREA, which can exist anywhere on the host system that comes to the presently visited customer. It is advised to establish the atmosphere variable $office to $HOME/o3de-sample.
- Establish the atmosphere variable for
$ WORK AREAto make use of for this walkthrough.export office=$ HOME/o3de-sample - Duplicate the Robotic Vacuum cleaner Example application database.
mkdir -p $WORK AREA. git duplicate https://github.com/o3de/RobotVacuumSample $WORKSPACE/RobotVacuumSample. - Develop a simulation docker picture called
o3de_robot_vacuum_simulationcd $WORKSPACE/RobotVacuumSample/Docker. docker develop-- build-arg IMAGE_TYPE= simulation -t o3de_robot_vacuum_simulation. - Develop the navigating pile docker picture called
o3de_robot_vacuum_navstackcd $WORKSPACE/RobotVacuumSample/Docker. docker develop-- build-arg IMAGE_TYPE= navstack -t o3de_robot_vacuum_navstack. - If your atmosphere fulfills the minimum O3DE hardware requirements, you can run these docker containers by adhering to the docker readme.
Develop and press the AWS RoboMaker container photos to Amazon ECR
The container photos produced for the trial are created to run in your area on a Linux host maker. In order to work on AWS RoboMaker, the container photos require to have the wonderful DCV plugins set up. NICE DCV is a high-performance remote display screen method that will certainly be made use of to stream the simulation from AWS RoboMaker.
- Expand the simulation docker picture over to make it possible for wonderful DCV by producing a data
$ WORKSPACE/Dockerfile. simulation.robomakerand duplicating the adhering to material right into it.FROM o3de_robot_vacuum_simulation: newest. ENV WORK AREA=/ data/workspace. WORKDIR $WORK AREA. ENV DEBIAN_FRONTEND= noninteractive. ENV LAUNCH_FULLSCREEN_OPT= 1. # Mount Wonderful DCV (from https://download.nice-dcv.com). RUN wget https://d1uj6qtbmh3dt5.cloudfront.net/NICE-GPG-KEY. RUN gpg-- import NICE-GPG-KEY. RUN wget https://d1uj6qtbmh3dt5.cloudfront.net/2023.0/Servers/nice-dcv-2023.0-15487-ubuntu2204-x86_64.tgz. RUN tar -xvzf nice-dcv-2023.0 -15487- ubuntu2204-x86_64. tgz. & & mkdir -p/ etc/modprobe. d. & & apt-get set up -y/ data/workspace/nice-dcv -2023.0 -15487- ubuntu2204-x86_64/ nice-dcv-server_2023.0.15487 -1 _ amd64.ubuntu2204.deb. / data/workspace/nice-dcv -2023.0 -15487- ubuntu2204-x86_64/ nice-dcv-gl_2023.0.1039 -1 _ amd64.ubuntu2204.deb. / data/workspace/nice-dcv -2023.0 -15487- ubuntu2204-x86_64/ nice-dcv-gltest_2023.0.318 -1 _ amd64.ubuntu2204.deb. # Mount xterm for straight console accessibility. RUN appropriate upgrade & & apt-get set up -y xterm. - Develop a brand-new docker picture called
o3de_robot_vacuum_simulation_robomakerdocker develop -t o3de_robot_vacuum_simulation_robomaker -f $WORKSPACE/Dockerfile. simulation.robomaker $WORK AREA - Develop a database in the Amazon ECR for the brand-new simulation docker picture.
aws ecr create-repository-- repository-name o3de-robot-vacuum-simulationThe command will certainly return a JSON outcome for the brand-new database:
{ " database": { " repositoryArn": "arn: aws: ecr: us-west-2:000000000000: repository/o3de-robot-vacuum- simulation",. " registryId": "000000000000",. " repositoryName": "o3de-robot-vacuum-simulation",. " repositoryUri": "000000000000.dkr.ecr.us-west-2. amazonaws.com/o3de-robot-vacuum-simulation",. " createdAt": 1674082385.0,. " imageTagMutability": "MUTABLE",. " imageScanningConfiguration": { " scanOnPush": incorrect. },. " encryptionConfiguration": { " encryptionType": "AES256". } } } - Establish a setting variable for the simulation Amazon ECR database with the
repositoryUriarises from the JSON result.export ECR_SIMULATION_URI= 000000000000.dkr.ecr.us-west-2. amazonaws.com/o3de-robot-vacuum-simulation - Log right into Amazon ECR from your regional Docker runtime.
aws ecr get-login-password|docker login-- username AWS-- password-stdin $ECR_SIMULATION_URI - Tag the docker picture
o3de_robot_vacuum_simulation_robomakerwith the very same database URI.docker tag o3de_robot_vacuum_simulation_robomaker $ECR_SIMULATION_URI - Press the brand-new simulation docker picture toAmazon ECR
docker press $ECR_SIMULATION_URINote: Because of the dimension of the container picture (~ 20 GB) it might spend some time to finish and submit depending upon your net connection.
- Expand the navigating docker picture over to make it possible for NICE DCV by producing a data
$ WORKSPACE/Dockerfile. navstack.robomakerand duplicating the adhering to material right into it.FROM o3de_robot_vacuum_navstack: newest. ENV WORK AREA=/ data/workspace. WORKDIR $WORK AREA. ENV DEBIAN_FRONTEND= noninteractive. # Mount Wonderful DCV (from https://download.nice-dcv.com). RUN wget https://d1uj6qtbmh3dt5.cloudfront.net/NICE-GPG-KEY. RUN gpg-- import NICE-GPG-KEY. RUN wget https://d1uj6qtbmh3dt5.cloudfront.net/2023.0/Servers/nice-dcv-2023.0-15487-ubuntu2204-x86_64.tgz. RUN tar -xvzf nice-dcv-2023.0 -15487- ubuntu2204-x86_64. tgz. & & mkdir -p/ etc/modprobe. d. & & apt-get set up -y/ data/workspace/nice-dcv -2023.0 -15487- ubuntu2204-x86_64/ nice-dcv-server_2023.0.15487 -1 _ amd64.ubuntu2204.deb. / data/workspace/nice-dcv -2023.0 -15487- ubuntu2204-x86_64/ nice-dcv-gl_2023.0.1039 -1 _ amd64.ubuntu2204.deb. / data/workspace/nice-dcv -2023.0 -15487- ubuntu2204-x86_64/ nice-dcv-gltest_2023.0.318 -1 _ amd64.ubuntu2204.deb. RUN wget https://d1uj6qtbmh3dt5.cloudfront.net/nice-dcv-ubuntu2204-x86_64.tgz. # Mount xterm for straight console accessibility. RUN appropriate upgrade & & apt-get set up -y xterm. - Develop a brand-new container picture called
o3de_robot_vacuum_navstack_robomakerdocker develop -t o3de_robot_vacuum_navstack_robomaker -f $WORKSPACE/Dockerfile. navstack.robomaker $WORK AREA - Develop a database in Amazon ECR for the brand-new navigating pile docker picture.
aws ecr create-repository-- repository-name o3de-robot-vacuum-navstackThe command will certainly return a JSON outcome for the brand-new database:
{ " database": { " repositoryArn": "arn: aws: ecr: us-west-2:000000000000: repository/o3de-robot-vacuum- navstack",. " registryId": "000000000000",. " repositoryName": "o3de-robot-vacuum-navstack",. " repositoryUri": "000000000000.dkr.ecr.us-west-2. amazonaws.com/o3de-robot-vacuum-navstack",. " createdAt": 1674088085.0,. " imageTagMutability": "MUTABLE",. " imageScanningConfiguration": { " scanOnPush": incorrect. },. " encryptionConfiguration": { " encryptionType": "AES256". } } } - Establish a setting variable for the navigating pile Amazon ECR repository with the
repositoryUriarises from the json result.export ECR_NAVSTACK_URI= 000000000000.dkr.ecr.us-west-2. amazonaws.com/o3de-robot-vacuum-navstack - Tag the docker picture
o3de_robot_vacuum_navstack_robomakerwith the very same database URI.docker tag o3de_robot_vacuum_navstack_robomaker $ECR_NAVSTACK_URI - Press the brand-new navigating pile docker picture toAmazon ECR
docker press $ECR_NAVSTACK_URI
Develop an AWS RoboMaker simulation
The following action is to develop an AWS RoboMaker simulation making use of the recently produced container photos. The operations includes specifying the basic criteria for the simulation such as an IAM duty, calculate kind (collection to CPU and GPU), and the simulation period. You will certainly likewise require to develop both a Robotic application and Simulation application for the simulation. Below is a detailed go through of this procedure.
- Click ‘Develop simulation task’ from the ‘Simulation jobs‘ web page. (confirm your picked AWS area)


Number 1– The simulation tasks web page
- Set up the simulation task information and set up the ‘Calculate kind’ to ‘CPU and GPU’.

Number 2– Set up the simulation information such as the task period, Failing habits, IAM duty, Calculate kind, and Simulation/GPU Device Purviews.
- Develop a brand-new robotic application called ‘o3de-robot-vacuum-navstack’ and choose ‘o3de-robot-vacuum-navstack’ from ECR by clicking ‘Browse ECR’. Examine ‘Keep up streaming session’, and established ‘Release command’ to ‘/ data/workspace/LaunchNavStack. celebration’.

Number 3– Specify a brand-new robotic application based upon the uploaded ‘o3de-robot-vacuum-navstack’ docker picture
- Develop a brand-new simulation application called ‘o3de-robot-vacuum-simulation’ and choose ‘o3de-robot-vacuum-simulation’ from ECR by clicking ‘Browse ECR’. Examine ‘Keep up streaming session’, and established ‘Release command’ to ‘/ data/workspace/LaunchSimulation. celebration’.

Number 4– Specify a brand-new simulation application based upon the uploaded ‘o3de-robot-vacuum-simulation’ docker picture
- Testimonial the simulation task prior to producing it.

- Click ‘Develop’ to develop and introduce the simulation task.

Number 6– The standing will certainly reveal ‘Preparing’ while the simulation task is being produced and released prior to you have the ability to take control of it.
Sight and manage the brand-new simulation task
Once the standing of the simulation task adjustments to ‘Running’, the ‘Attach’ switches on each device will certainly be offered to check out and/or manage the simulation task.

The ‘Attach’ for the Simulation application will certainly introduce the O3DE launcher that is running the simulation customer.

The simulation customer offers a third individual sight of the Robotic Vacuum cleaner that has actually been put within a loft space circumstance. Now, the robotic is waiting for commands that will certainly be sent out to it making use of ROS 2.
To manage the robotic vacuum cleaner, open up the RViz 3D visualization tool which is given as component of the ROS plan. This is done by clicking ‘Attach’ for the Robotic Application.

With the RViz device, you can define indicate guide the Robotic Vacuum cleaner to browse to. It will certainly utilize its substitute Lidar sensing unit to ideal browse to the preferred factor without hitting any type of barrier. This is done by clicking ‘2D Objective Posture’ in RViz and defining a factor in the pictured map.
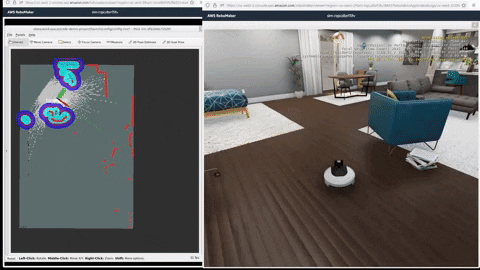
As the robotic browses the space, it maps its atmosphere with its Lidar sensing unit which will certainly likewise be pictured in RViz. In an independent robotic vacuum cleaner circumstance, a container with the real computerized robotic code will certainly change the example one in this presentation to manage the robotic instantly.
Tidying Up
The container photos produced in this guide overall around 20 gigabytes of information. If you no more requirement this example robotic vacuum cleaner application, you can remove the adhering to artefacts:
- The o3de-robot-vacuum-navstack and o3de-robot-vacuum-simulation databases in ECR
- The o3de-robot-vacuum-navstack robotic application in AWS RoboMaker under ‘Robotic Applications’
- The o3de-robot-vacuum-simulation application in AWS RoboMaker under ‘Simulation Applications’
Final Thought
This ends this tutorial on exactly how to run a robotics simulation making use of O3DE in AWS RoboMaker. We went through the actions needed to prepare an O3DE container picture with a robotics simulation application and implemented that container in AWS RoboMaker after a couple of setup actions. Since you have actually finished running this example, you can attempt to develop your very own robot simulation job with O3DE and have it work on AWS RoboMaker. To find out more concerning O3DE, please go to https://www.o3de.org to learn even more info.
发布者:Steve Pham,转转请注明出处:https://robotalks.cn/running-high-fidelity-o3de-simulations-in-aws-robomaker/